Contents
How to trim eyebrows: strays only, shape untouchedWhy strays only: brows identify and express, and plucked hairs may not returnWhich tool: scissors first, then tweezers, a razor lastFour steps: draw, trim, pluck, stopThe three-point map is a ruler for checking, not the right shapeChecking the result: one photo in the same light, a second pass after two weeksIf you took too much, and a few safety basicsFAQKey points
- Strays only: long hairs past the top edge, loose hairs below the lower edge, odd hairs between the brows. Leave the head, arch and tail alone, and keep any hair you are unsure about.
- In a 2003 study, removing the brows from familiar faces hurt recognition more than removing the eyes; it tested recognition only. Plucked hairs usually grow back, but years of frequent plucking can damage follicles for good.
- Order tools by how much they touch: small scissors first, tweezers for single hairs second, a razor last. When plucking, stop and look after every two or three hairs.
- The head-over-inner-corner, tail-on-the-nostril-line map is a makeup convention, and sources draw the lines differently. Use it to check that you changed nothing, not as a target.
- After trimming, take one photo in the same light as the before photo, and wait two weeks before deciding on a second pass.
How to trim eyebrows: strays only, shape untouched
How to trim eyebrows without wrecking them: do not design a new shape, only take away the hairs that never belonged to this one. If you are unsure about a hair, leave it. A hair you leave can be removed any day; a hair you take is gone for weeks.
Strays live in three places:
- Long hairs past the top edge. Brush the whole brow upward; the ones that stand above the outline, sticking out a little, are the target.
- Loose hairs below the lower edge. Single hairs scattered outside the bottom line of the brow.
- Hairs between the brows. The odd ones on the bridge of the nose, between the two heads.
Three places stay untouched: the head, which sets how far apart the brows sit; the arch, where the brow turns; and the tail, which sets how long it runs. Move any of those and you are changing the shape, not tidying it. For choosing a shape, see eyebrow shape for your face; for how far the brow sits from the eye, see brow-to-eye distance. This article does one job: how to do it without making a mistake.
The tools are ordered by how much they touch. Scissors shorten only the part of the hair above the skin and leave follicle and skin alone, so the hair grows back looking the same. Tweezers reach the root: the hair takes weeks to return, and frequent plucking can hurt the follicle. A razor works on a whole patch of hair and skin at once, takes a lot in one pass, and it sits right beside the eyelid, the thinnest skin on the body, so a slip reddens it easily. The more a tool touches, the later and the less often you use it.
Why strays only: brows identify and express, and plucked hairs may not return
Brows are not just decoration. In a 2003 study by Sadr, Jarudi and Sinha, people tried to recognise familiar faces, and when the eyebrows were removed from the images, recognition dropped sharply, more than when the eyes were removed. The authors concluded that for recognising a person, eyebrows may matter at least as much as eyes. The abstract also notes that earlier work had linked brows to expression and nonverbal communication.
What that study can tell you is limited. It tested recognising people you know, not attractiveness; what was removed was the whole brow, not a few strays; and nobody has tested trimming with it. All you can infer is one thing: the brow is a part of the face that carries information, so do not change it casually.
Now plucking. Do plucked hairs grow back? Mostly yes. A Cleveland Clinic dermatologist says they usually return within a few months, since the brow growth cycle runs about three to four months; but plucking every day can damage follicles and even scar, and then the hair stops coming. A dermatologist interviewed by NBC was more careful: forceful plucking or chronic irritation can damage the follicle, she called it rare, and once it happens it is permanent. A Duke dermatology professor wrote in Dermatology Times that every pluck carries a small chance of permanent follicle damage, and that the most common cause of thin brows later in life is plucking too much when young.
In the accounts I read, none says how to tell in advance which kind of follicle you have. So the rule is not “never pluck a hair”. It is: pluck little, pluck slowly, pluck only what is certainly a stray, and cut what you can instead.
Before you touch anything, record a starting point. In the light you will use for the comparison later, take a front-facing photo: face a window, prop the phone at eye height 1.5–2 m away, use the rear camera with a 3–10 second timer, hair off the brows, beauty filter off. Then look at the gap between the brow and the eye: how far the lower edge of the brow sits from the upper lid, and whether it looks loose or tight. That is the before picture, and you will compare against it. For the photo setup, see the front-facing photo guide and selfie lighting.
Which tool: scissors first, then tweezers, a razor last
No study has compared the three tools, and guides disagree. Japanese beauty-site tutorials make tweezers the main tool in some cases and use an electric trimmer for the fine hair under the brow in others, while one guide quoted in our eyebrow shape for your face article says tweezers, no razor. The order below keeps the overlap: cut before you pluck, pluck single hairs before you shave.
| Tool | Use it on | Watch out for |
|---|---|---|
| Small brow scissors (round or curved tip) | Long hairs that stand above the top edge when brushed up | One hair at a time, and cut the tip, not mid-hair: a blunt cut makes the hair stand at an angle, prickly and hard-looking. Point the tips toward the tail, never toward the eye. Regular scissors are too big and too blunt. |
| Slanted tweezers | Single strays below the lower edge or between the brows | Pull in the direction the hair grows, one at a time, and stop to look after every two or three. Frequent plucking can hurt follicles and can bring ingrown hairs and folliculitis. |
| Brow razor or electric brow trimmer | Only the fine fuzz just outside the lower edge, and only if needed | It sits right beside the eyelid, the thinnest skin on the body, and reddens easily. Stay off the brow itself: Japanese tutorials warn that a shaved arch flattens the face and makes the lid look puffy. A dull blade makes trouble more likely. |
Four steps: draw, trim, pluck, stop
Set up: face a window so the light is bright and even, wash and dry your face, clean the tools (last section), and keep a spoolie and a brow pencil or powder at hand.
- Draw the outline you already have. With pencil or powder, trace lightly along the densest part of the top and bottom edges. This is not a new shape; it only lets you see which hairs fall outside the line. Several Japanese makeup artists say the same thing: draw first, because working on bare brows is where people take too much.
- Brush up and trim past the top edge. Brush the whole brow upward, then snip the hairs that stand above the line one by one, at an angle, tips only. Work from the middle toward the tail; leave the short upright hairs at the head. Brush down once to catch long hairs hiding underneath. Turning your face sideways makes the sticking-out tips easiest to see.
- Clear the strays below and between. Warm the skin with a damp washcloth first. Hold the skin taut and pluck one hair at a time in the direction of growth. Look back after every two or three, comparing the two sides. Between the brows, clear only what sits between the heads and never the edge of the head itself.
- Brush into place and stop. Smooth the brow, wipe off the pencil line, look at the whole. That is the end, even if it feels like you could do more. No second pass today.
If the skin is red, hold a cool cloth on it and moisturise; the brow does not look right until the redness fades.
The three-point map is a ruler for checking, not the right shape
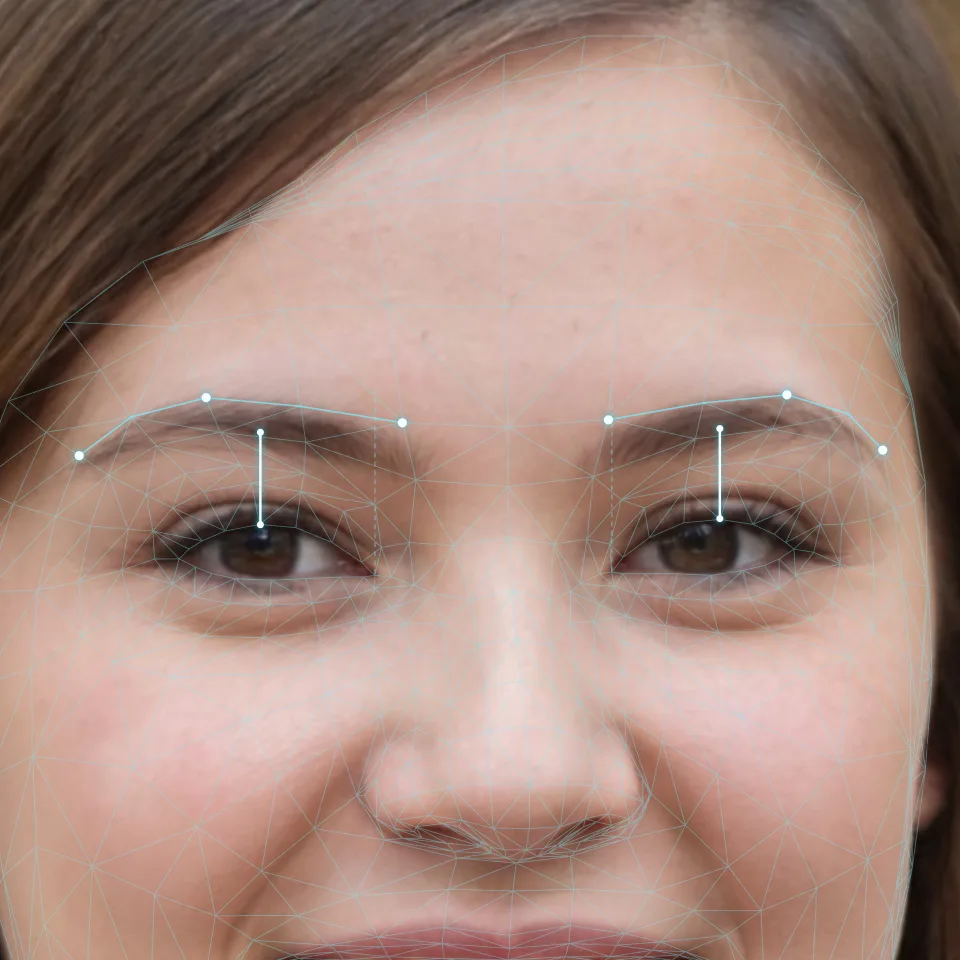
The common map says: head above the inner eye corner or the nostril wing, arch above the outer part of the iris, tail on the line from the nostril wing past the outer eye corner. It comes from makeup practice. Nobody measured it as an ideal, and sources do not agree with each other. For the arch, some put it above the outer edge of the iris, some on a line through the pupil’s centre, some above the middle of the outer white of the eye. For the tail, some tutorials use the nostril wing through the outer eye corner, some the centre of the lower lip through the outer eye corner, some the mouth corner through it: all three lines pass through the same outer eye corner at different angles, so the tail lands in different places.
So the map has exactly one use here: to check that you did not change the shape. Hold the same pencil against the face before and after. The head and tail should sit where they sat in the before photo relative to the lines. If they moved, you took too much.
The reverse also holds: a head that sits inside or outside the line is not a stray. On our sample photo the left brow head starts 17 px inside the inner-corner line (see eyebrow shape for your face), and that is simply its shape. Dragging a head onto the line means changing the shape, and a plucked head is hard to take back.
Checking the result: one photo in the same light, a second pass after two weeks
Mirrors mislead. Every hair in a magnifying mirror is invisible at talking distance, and a mirror also flips you left to right; see why you look different in photos than in the mirror. So check with a photo:
- Same spot, same light. The same window, the phone at eye height 1.5–2 m away, rear camera with a timer, hair off the brows. Skip the front-camera selfie: it is shot from too close, and the face distorts.
- Look at normal size. View it full-screen on the phone, not zoomed in to the pores. A difference you can see is a difference other people can see.
- Put it beside the before photo and check four things. The edges are still soft, with a gradient of hair tips and no hard line. The head and tail sit where they did. Neither side is emptier than the other. The gap between brow and eye has not visibly changed; clearing strays below the lower edge lifts the bottom line a little, see brow-to-eye distance.
- Show one person for five seconds. Ask whether they notice anything different. If they cannot say, you most likely did it right.
For a reference on the eye and brow-gap dimensions, test with FacialRate before and after, with the same setup. The face report describes that one photo, so with the same setup the two reports are comparable; it marks each dimension good or room to grow, and it does not choose a brow shape for you.
Wait two weeks before the second pass. This is a rule of practice, not a study finding, and it has three reasons. First, a plucked hair takes weeks to return, up to about six, and a trimmed hair cannot grow back the same day, so a mistake cannot be fixed that afternoon. Second, skin is red right after, and the brow only reads true once the redness is gone; Cleveland Clinic says threading leaves redness and swelling for hours. Third, your eyes are most sensitive just after trimming and everything looks like a stray; two weeks later you can tell the real ones. Then treat only the few hairs that still stand out in the photo. After that, use scissors when long hairs stick out and tweezers when strays have returned, and there is no need to do either often.
If you took too much, and a few safety basics
Already took too much: stop. Do not even out the other side; one slip becomes two. Fill gaps with brow powder or pencil in short strokes along the hair direction, not a solid block, and wait. A Cleveland Clinic dermatologist says most brows grow back within a few months, after you stop plucking, waxing and shaving; if nothing changes after about four months, see a dermatologist rather than trying more yourself.
Tools: disinfect tweezers with alcohol before and after plucking (Healthline’s advice), and treat scissors the same way. For razors, the American Academy of Dermatology says to change a single-blade razor after 5 to 7 shaves, dry it fully and keep it somewhere dry, not in the shower. That advice is about shaving the face and does not cover the eye area, and Cleveland Clinic says the eyelid is the thinnest skin the body has, so go lighter just under the brow and skip the razor if in doubt.
Skin: skip any spot that is red, broken, pimpled or scabbed. If small pimple-like bumps appear in the days after, it could be folliculitis: the Academy’s advice is to stop the trigger for 30 days, apply warm compresses 3 to 4 times a day for 15 to 20 minutes, and see a dermatologist if it does not clear.
Not covered here: hair-removal cream, wax and dye. The Academy says to patch-test a depilatory cream on a small area and wait 24 hours; nothing in this method uses any of them.
FAQ
Where do I start when trimming my eyebrows for the first time?
Brush the brows up and snip the tips of any hairs that stick out past the top edge, one at a time with small scissors. Then clear single hairs below the lower edge and between the brows. Leave the head, arch and tail alone, and keep any hair you are unsure about.
Does shaving eyebrows make them grow back thicker?
No. Cleveland Clinic dermatologists say shaving does not make hair thicker or faster; regrowth just has a blunt tip that feels coarse and shows the thicker base of the hair. Brow hair grows slowly, so that stubbly stage lasts longer. Shaving the brow itself also takes too much too easily, so beginners are better off trimming first.
What do I do if I trimmed or plucked too much?
Stop, and do not even out the other side. Fill the gaps with brow powder or pencil in short strokes along the hair direction, and wait. Most brows grow back within a few months, except for people who pluck daily; if nothing has changed after about four months, see a dermatologist.
How often should I trim my eyebrows?
Scissors only when long hairs start to stick out; one brand tutorial says about once a week. Tweezers only when strays have grown back, and a plucked hair can stay away for up to six weeks, so there is no need to pluck often. After your first session, wait at least two weeks before a second pass.
Can I pluck nose hair?
Trim it, do not pluck it. A Cleveland Clinic ENT doctor advises trimming because plucking can cause ingrown hairs and infection, and a study of nasal vestibulitis named plucking as a main risk factor. Use small round-tipped scissors or an electric trimmer, and only take off what shows; nose hair also helps filter the air you breathe.