Contents
Lip makeup for your lip shape: what does it actually move?Read three numbers on the sample photoLiner, depth and gloss by readingWhere artists disagree: how far, the corners, full lipsHow FacialRate does it: same setup, before and afterFAQKey points
- Lip makeup moves where the edge reads, what is dark and what is bright.
- Overline the lip you want fuller, follow the edge on the fuller one. Most artists stay within about 1 mm.
- Light and gloss go in the centre, depth at the edge. Artists disagree on the corners.
- Read the lips on a relaxed, closed-mouth photo, not mid-smile.
Lip makeup for your lip shape: what does it actually move?
Lips are not flat. The centre of each lip bulges forward and catches light; towards the edges the surface turns away and darkens. Your eye reads fullness from that gradient.
So each tool maps to one job:
- Liner sets where the edge reads. Draw just outside the edge and that spot reads fuller.
- Depth at the outer edge and corners pushes that ring back.
- Light shades and gloss in the centre bring it forward, the same logic as highlighting a cheekbone.
The distance between the corners stays put. The same idea for the whole face is in highlight and contour basics.
Read three numbers on the sample photo
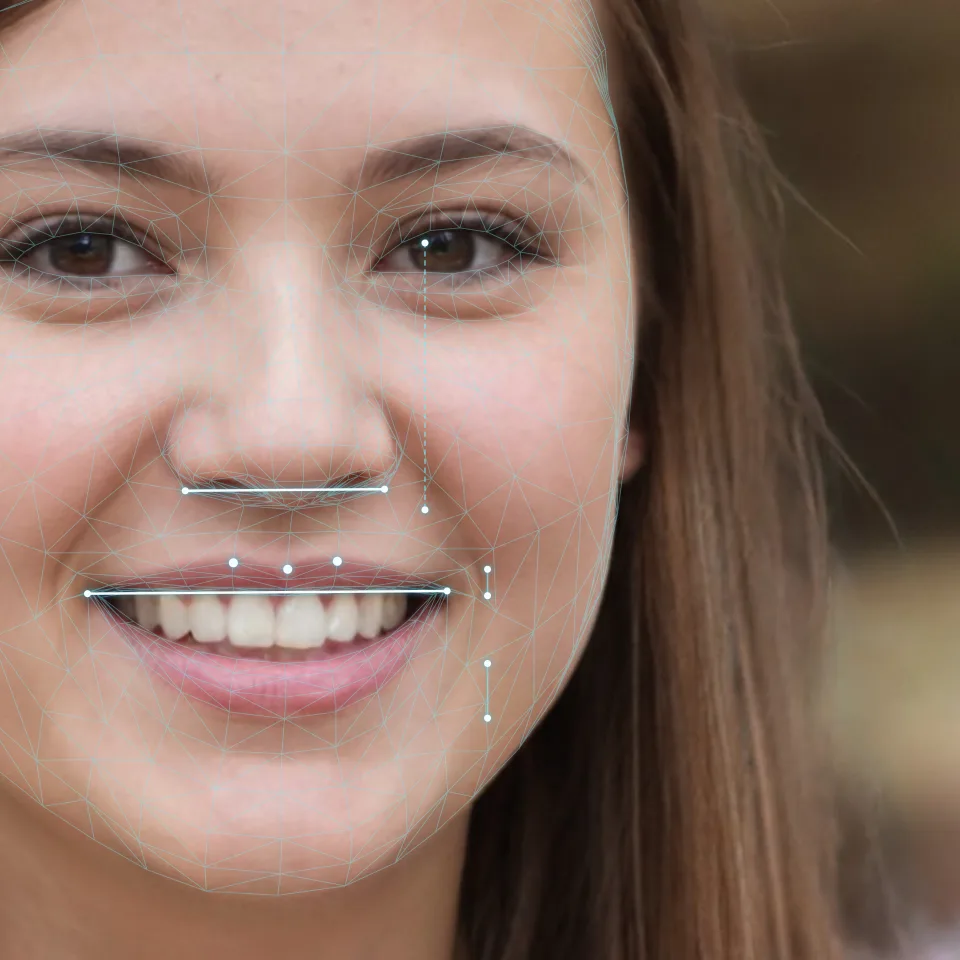
- Upper to lower. The sample’s upper lip is 20 and the lower 41: 0.49. But she is smiling, which stretches the upper lip, so it is not usable. Common values are 0.7 to 0.8.
- Bow. The peaks sit level and the dip is 5 to 6 lower, about 2% of the mouth width: a soft bow, also mid-smile.
- Width. The mouth is 267, 1.80 times the nose width at the wings (148); see mouth to nose ratio. Smiling pulls the corners apart, so this reads high too.
So take these on a relaxed, closed-mouth photo (setup in facial thirds). What each end is called is in lip shape types.
Liner, depth and gloss by reading
| Reading | Liner | Depth | Light and gloss |
|---|---|---|---|
| Thin upper lip (under about 0.55) | Bow centre slightly out, lower on the edge | Outer edge | Lower-lip centre only |
| Fuller upper lip (above 1.0) | Upper on the edge, lower centre out | Outer edge | Centre |
| Soft bow | A V just outside the peaks | — | Dot at the bow centre |
| Defined bow | On the peaks, never above | Outer edge | Centre |
| Narrow mouth | Lower lip drawn as a trapezoid | — | Centre |
| Thin overall | About 1 mm out all round, filled in | — | Gloss all over |
| Full overall | Inside the edge | Corners, blended inward | Sheer shade, or centre only |
| Downturned corners | Lower line stops early and lifts | — | Concealer swept up at the corners |
Blend every line with a fingertip or brush.
Where artists disagree: how far, the corners, full lips
- How far out. Most say about 1 mm; one Japanese artist goes to about 2 mm on thin lips.
- The corners. One camp keeps the corner line on the natural edge and overlines only the centres, so the mouth reads rounder. Another fills the corners with depth up to the midpoint between corner and peak and overlines all round, so it reads wider. A third darkens the corners of a large mouth to draw it inward. Same move, opposite effects, depending on whether overlining comes with it.
- Full lips. A sheer light shade along the edge, or a deep shade blotted, then colour only in the centre.
Which is right? Test it: same window, same phone position and distance (1.5–2 m), one relaxed photo of each version, side by side.
How FacialRate does it: same setup, before and after
- A free face report with your face type, strongest feature, three highlights and 11+ dimensions, nose and lips among them, plus one tip. Tips cover photography, hair, makeup and skincare only.
- It runs on your device. The browser finds 478 face landmarks, and your photo is never sent to a server.
- It says a score describes this photo. Light, angle and expression change what the model sees, as the smiling sample shows.
- Free, no limit on tries. Rate my face before and after with the same setup, and you compare the makeup itself. With any face analyzer, keep the photo constant first.
FAQ
What colour should the lip liner be?
Most artists say one or two shades deeper than your own lip colour, and never lighter than the lipstick, or a pale ring shows.
Will overlining be obvious?
Keep it within about 1 mm, keep the corners on the natural line and blend the liner. It then reads as shadow. Step back to check.
My two bow peaks sit at different heights. What then?
Check your head is level first. Artists use liner to even out lips, drawing on the top edge of the lower peak so both match.